This bowl is available for purchase at: https://formanwoodworking.com/product...
_____________________________________
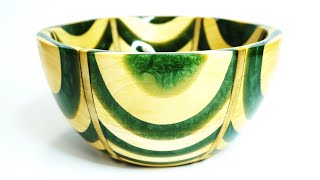
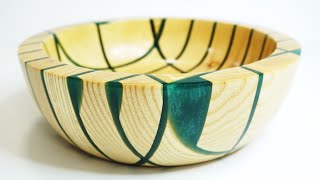
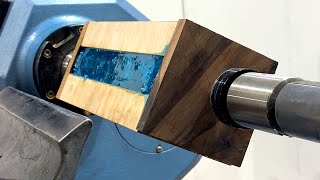
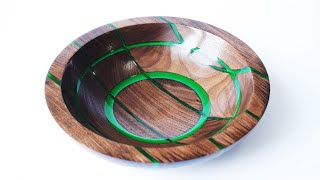
Today's video: Hello, friends! After proving that I could indeed pull off a board/economy bowl two weeks ago, I decided to really test my limits and make something much more complex. And, oh boy, did this one take a lot of work! I lost track of how many separate steps there were in making this bowl, but I think it took the better part of two weeks to complete from start to finish. For this project, I used 3/4-inch redheart and 1/4-inch red oak wood. I first made 3 separate planks of redheart and oak glued together. Once dry, these were cut down to size using my miter saw (I really need a band saw for this sort of stuff), and additional red oak pieces were glued onto the inside surfaces of the planks. After another day of letting the glue-ups dry, I chiselled down the excess oak to flatten the planks, and then I hot glued all the planks down onto a mould for the resin pour. For the resin, I went with an opaque emerald mica that I felt complemented the redheart very nicely. This was again left to cure for 24 hours, and once hardened, I sanded the whole board flat, mounted it on my lathe, and began turning the rings off. The angle I used was somewhere between 45-50 degrees for each ring (couldn’t get a perfectly precise measure), and for the majority of this process, I used the same jig I built in the last uploaded video. My parting tool, however, snapped in half while turning off the second ring (this scared me half to death when it happened), and although I’m still trying to figure out how that occurred, I resorted to using my 1/8-inch parting tool for the final ring (which worked surprisingly well!). Once all the rings were cut, I connected them all together with epoxy resin between the seams and again left the piece to cure for 24 hours. After this, the rest of the process was quite easy. I trimmed down the rough edges on the lathe, sanded the piece up to 2000 grit, and finished the bowl with several coats of Waterlox.
This might be one of my favourite bowls I’ve ever worked on. Despite the many, may hours I sank into this, the whole process went extremely well (minus the broken parting tool), and I absolutely love the final result! For a while, I had considered using a blue mica pigment (light or dark, I couldn’t decide), but I’m very happy I went with green in the end. I just love how it looks with the redheart.
I’d love to hear what you think down below! Should I have used some different colours?
_____________________________________
Want to use the same pigments shown in this video? Check out the following affiliate code for a discount on SquidPoxy products! https://squidpoxy.ca/?sacode=duo8gk&u... _____________________________________
Check out our Instagram! https://www.instagram.com/formanwoodw...
_____________________________________
Key equipment/products I used:
Rikon 70-220 VSR Midi Lathe: https://www.leevalley.com/en-ca/shop/...
Woodstock 1/2 inch bowl gouge: https://www.amazon.ca/gp/product/B005...
Hamlet 1/8 inch parting tool: https://www.elitetools.ca/en/product/...
CA Technologies Resin Casting Pressure Pot: https://www.finishsystems.com/product...
Alumilite clear cast: https://www.alumilite.com/resins/amaz...
Waterlox Original Varnish: https://waterlox.com/original/
Mould Material
Foam Core Poster: https://canada.michaels.com/en/20x30-...
Plastic Poster Sheet: https://www.michaels.com/product/pa-p...


Информация по комментариям в разработке